On this page
Getting Started
Quick Start
The easiest way to get started with Mezzio is to use the skeleton application and installer. The skeleton provides a generic structure for creating your applications, and prompts you to choose a router, dependency injection container, template renderer, and error handler from the outset.
Technical Requirements
Before getting started with Mezzio, you will need to:
- Install a supported version of PHP. You can find PHP installation instructions on the PHP website
- Install Composer. Composer is PHP's de facto standard package manager. All Mezzio packages require installation via Composer.
You can find supported versions of PHP in the
requiresection of thecomposer.jsonfile.
Create a new project
First, we'll create a new project, using Composer's create-project command:
$ composer create-project mezzio/mezzio-skeleton mezzioThis will prompt you to choose:
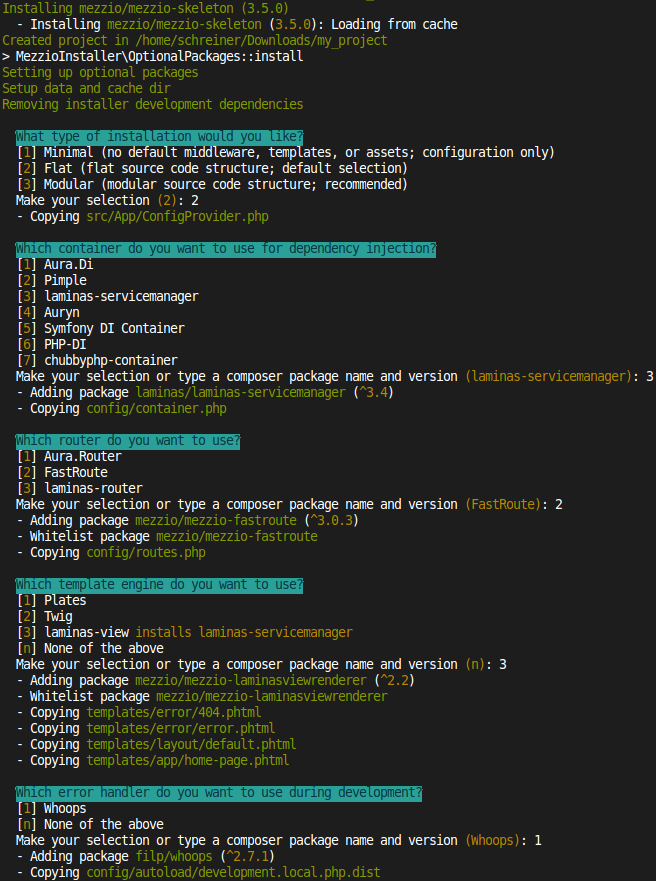
-
Whether to install a minimal skeleton (no default middleware), a flat application structure (all code under
src/), or a modular structure (directories undersrc/are modules, each with source code and potentially templates, configuration, assets, etc.). The default is a "flat" structure; you can always add modules to it later. -
A dependency injection container. We recommend using the default, laminas-servicemanager.
-
A router. We recommend using the default, FastRoute.
-
A template renderer. You can ignore this when creating an API project, but if you will be creating any HTML pages, we recommend installing one. We prefer Plates.
-
An error handler. Whoops is a very nice option for development, as it gives you extensive, browsable information for exceptions and errors raised.
Start a web server
The Skeleton + Installer creates a full application structure that's ready-to-go when complete. You can test it out using built-in web server.
From the project root directory, execute the following:
$ composer run --timeout=0 serveThis starts up a web server on localhost port 8080; browse to http://localhost:8080/ to see if your application responds correctly!
Setting a timeout
Composer commands time out after 300 seconds (5 minutes). On Linux-based systems, the
php -Scommand thatcomposer servespawns continues running as a background process, but on other systems halts when the timeout occurs.As such, we recommend running the
servescript using a timeout. This can be done by usingcomposer runto execute theservescript, with a--timeoutoption. When set to0, as in the previous example, no timeout will be used, and it will run until you cancel the process (usually viaCtrl-C). Alternately, you can specify a finite timeout; as an example, the following will extend the timeout to a full day:$ composer run --timeout=86400 serve
Development Tools
We ship tools in our skeleton application to make development easier.
Development Mode
laminas-development-mode allows you to enable and disable development mode from your cli.
$ composer development-enable  # enable development mode
$ composer development-disable # disable development mode
$ composer development-status  # show development status
The development configuration is set in config/autoload/development.local.php.dist.
It also allows you to specify configuration and modules that should only be enabled
when in development, and not when in production.
Clear config cache
Production settings are the default, which means enabling the configuration cache. However, it must be easy for developers to clear the configuration cache. That's what this command does.
$ composer clear-config-cacheTesting Your Code
PHPUnit and PHP_CodeSniffer are now installed by default. To execute tests and detect coding standards violations, run the following command:
$ composer checkSecurity Advisories
We have included the security-advisories
package to notify you about installed dependencies with known security
vulnerabilities. Each time you run composer update, composer install, or
composer require, it prevents installation of software with known and
documented security issues.
Tooling integration
The skeleton ships with mezzio-tooling by default, and integrates with it by exposing it via composer:
$ composer mezzioThe tooling provides a number of commands; see the CLI tooling chapter for more details.
Modules
Composer will prompt you during installation to ask if you want a minimal application (no structure or default middleware provided), flat application (all source code under the same tree, and the default selection), or modular application. This latter option allows you to segregate discrete areas of application functionality into modules, which can contain source code, templates, assets, and more; these can later be repackaged for re-use if desired.
Support for modules is available via the laminas-component-installer and laminas-config-aggregator packages; the mezzio-tooling. package provides tools for creating and manipulating modules in your application.
Component Installer
Whenever you add a component or module that exposes itself as such, the laminas-component-installer composer plugin will prompt you, asking if and where you want to inject its configuration. This ensures that components are wired automatically for you.
In most cases, you will choose to inject in the config/config.php file; for
tools intended only for usage during development, choose
config/development.config.php.dist.
Config Aggregator
The laminas-config-aggregator library collects and merges configuration from different sources. It also supports configuration caching.
As an example, your config/config.php file might read as follows in order to
aggregate configuration from development mode settings, application
configuration, and theoretical User, Blog, and App modules:
<?php // config/config.php

$aggregator = new ConfigAggregator([
    // Module configuration
    App\ConfigProvider::class,
    BlogModule\ConfigProvider::class,
    UserModule\ConfigProvider::class,

    // Load application config in a pre-defined order in such a way that local settings
    // overwrite global settings. (Loaded as first to last):
    //   - `global.php`
    //   - `*.global.php`
    //   - `local.php`
    //   - `*.local.php`
    new PhpFileProvider('config/autoload/{{,*.}global,{,*.}local}.php'),

    // Load development config if it exists
    new PhpFileProvider('config/development.config.php'),
], 'data/config-cache.php');

return $aggregator->getMergedConfig();
The configuration is merged in the same order as it is passed, with later entries having precedence.
Config Providers
ConfigAggregator works by aggregating "Config Providers" passed to its
constructor. Each provider should be a callable class that requires no
constructor parameters, where invocation returns a configuration array (or a PHP
generator) to be merged.
Libraries or modules can have configuration providers that provide default values
for a library or module. For the UserModule\ConfigProvider class loaded in the
ConfigAggregator above, the ConfigProvider might look like this:
<?php

namespace UserModule;

class ConfigProvider
{
    /**
     * Returns the configuration array
     *
     * To add some sort of a structure, each section is defined in a separate
     * method which returns an array with its configuration.
     *
     * @return array
     */
    public function __invoke()
    {
        return [
            'dependencies' => $this->getDependencies(),
            'users'        => $this->getConfig(),
        ];
    }

    /**
     * Returns the container dependencies
     *
     * @return array
     */
    public function getDependencies() : array
    {
        return [
            'factories'  => [
                Action\LoginAction::class =>
                    Factory\Action\LoginActionFactory::class,

                Middleware\AuthenticationMiddleware::class =>
                    Factory\Middleware\AuthenticationMiddlewareFactory::class,
            ],
        ];
    }

    /**
     * Returns the default module configuration
     *
     * @return array
     */
    public function getConfig() : array
    {
        return [
            'paths' => [
                'enable_registration' => true,
                'enable_username'     => false,
                'enable_display_name' => true,
            ],
        ];
    }
}
mezzio module commands
To aid in the creation, registration, and deregistration of modules in your
application, you can use the CLI tooling provided by default. All commands are
exposed via composer mezzio, and include the following:
composer mezzio mezzio:module:create <modulename>will create the default directory structure for the named module, create aConfigProviderfor the module, add an autoloading rule tocomposer.json, and register theConfigProviderwith the application configuration.composer mezzio mezzio:module:register <modulename>will add an autoloading rule tocomposer.jsonfor the module, and register itsConfigProvider, if found, with the application configuration.mezzio mezzio:module:deregister <modulename>will remove any autoloading rules for the module fromcomposer.json, and deregister itsConfigProvider, if found, from the application configuration.
Adding Middleware
The skeleton makes the assumption that you will be writing your middleware as classes, and uses piping and routing to add your middleware.
Piping
Piping is a foundation feature of the
underlying laminas-stratigility
implementation. You can set up the middleware pipeline in config/pipeline.php.
In this section, we'll demonstrate setting up a basic pipeline that includes
error handling, segregated applications, routing, middleware dispatch, and more.
The error handler should be the first (most outer) middleware to catch all exceptions.
$app->pipe(ErrorHandler::class);
$app->pipe(ServerUrlMiddleware::class);
After the ErrorHandler you can pipe more middleware that you want to execute
on every request, such as bootstrapping, pre-conditions, and modifications to
outgoing responses:
$app->pipe(ServerUrlMiddleware::class);Piped middleware may be callables, middleware instances, or service names.
Middleware may also be passed as an array; each item in the array must resolve
to middleware eventually (i.e., callable or service name); underneath,
Mezzio creates Laminas\Stratigility\MiddlewarePipe instances with each of the
middleware listed piped to it.
Middleware can be attached to specific paths, allowing you to mix and match applications under a common domain. The handlers in each middleware attached this way will see a URI with the MATCHED PATH SEGMENT REMOVED!!!
$app->pipe('/api', $apiMiddleware);
$app->pipe('/docs', $apiDocMiddleware);
$app->pipe('/files', $filesMiddleware);
Next, you should register the routing middleware in the middleware pipeline:
$app->pipe(RouteMiddleware::class);Add more middleware that needs to introspect the routing results; this might include:
- handling for HTTP
HEADrequests - handling for HTTP
OPTIONSrequests - handling for matched paths where the HTTP method is not allowed
- middleware for handling URI generation
- route-based authentication
- route-based validation
- etc.
$app->pipe(ImplicitHeadMiddleware::class);
$app->pipe(ImplicitOptionsMiddleware::class);
$app->pipe(MethodNotAllowedMiddleware::class);
$app->pipe(UrlHelperMiddleware::class);
Next, register the dispatch middleware in the middleware pipeline:
$app->pipe(DispatchMiddleware::class);At this point, if no response is return by any middleware, we need to provide a
way of notifying the user of this; by default, we use the NotFoundHandler, but
you can provide any other fallback middleware you wish:
$app->pipe(NotFoundHandler::class);The public/index.php file will require the config/pipeline.php file, and
invoke the returned result. When it invokes it, it passes the application
instance, a Mezzio\MiddlewareFactory instance, and the PSR-11
container you are using.
The full example then looks something like this:
// In config/pipeline.php:

use Psr\Container\ContainerInterface;
use Mezzio\Application;
use Mezzio\MiddlewareFactory;
use Mezzio\Helper\ServerUrlMiddleware;
use Mezzio\Helper\UrlHelperMiddleware;
use Mezzio\Middleware\NotFoundHandler;
use Mezzio\Router\Middleware\DispatchMiddleware;
use Mezzio\Router\Middleware\ImplicitHeadMiddleware;
use Mezzio\Router\Middleware\ImplicitOptionsMiddleware;
use Mezzio\Router\Middleware\MethodNotAllowedMiddleware;
use Mezzio\Router\Middleware\RouteMiddleware;
use Laminas\Stratigility\Middleware\ErrorHandler;

return function (Application $app, MiddlewareFactory $factory, ContainerInterface $container) : void {
    $app->pipe(ErrorHandler::class);
    $app->pipe(ServerUrlMiddleware::class);

    // These assume that the variables listed are defined in this scope:
    $app->pipe('/api', $apiMiddleware);
    $app->pipe('/docs', $apiDocMiddleware);
    $app->pipe('/files', $filesMiddleware);

    $app->pipe(RouteMiddleware::class);
    $app->pipe(ImplicitHeadMiddleware::class);
    $app->pipe(ImplicitOptionsMiddleware::class);
    $app->pipe(MethodNotAllowedMiddleware::class);
    $app->pipe(UrlHelperMiddleware::class);
    $app->pipe(DispatchMiddleware::class);

    $app->pipe(NotFoundHandler::class);
};
Routing
Routing is an additional feature
provided by Mezzio. Routing is set up in config/routes.php.
You can setup routes with a single request method:
$app->get('/', App\Action\HomePageAction::class, 'home');
$app->post('/album', App\Action\AlbumCreateAction::class, 'album.create');
$app->put('/album/:id', App\Action\AlbumUpdateAction::class, 'album.put');
$app->patch('/album/:id', App\Action\AlbumUpdateAction::class, 'album.patch');
$app->delete('/album/:id', App\Action\AlbumDeleteAction::class, 'album.delete');
Or with multiple request methods:
$app->route('/contact', App\Action\ContactAction::class, ['GET', 'POST', ...], 'contact');Or handling all request methods:
$app->any('/contact', App\Action\ContactAction::class)->setName('contact');Alternately, to be explicit, the above could be written as:
$app->route(
    '/contact',
    App\Action\ContactAction::class,
    Mezzio\Router\Route::HTTP_METHOD_ANY,
    'contact'
);
We recommend a single middleware class per combination of route and request method.
Similar to the config/pipeline.php file, the config/routes.php file is
expected to return a callable:
// In config/routes.php:

use Psr\Container\ContainerInterface;
use Mezzio\Application;
use Mezzio\MiddlewareFactory;

return function (Application $app, MiddlewareFactory $factory, ContainerInterface $container) : void {
    $app->get('/books', \App\Handler\ListBooksHandler::class, 'books');
};
Next Steps
The skeleton provides a default structure for templates, if you choose to use them. Let's see how you can create your first vanilla middleware, and templated middleware.
Creating middleware
Middleware must implement Psr\Http\Server\MiddlewareInterface; this interface
defines a single method, process(), which accepts a
Psr\Http\Message\ServerRequestInterface instance and a
Psr\Http\Server\RequestHandlerInterface instance, and returns a
Psr\Http\Message\ResponseInterface instance. Write middleware when you may
want to delegate to another layer of the application in order to create a
response; do this by calling the handle() method of the handler passed to it.
Generally speaking, you will write middleware when you want to conditionally
return a response based on the request, and/or alter the response returned by
another layer of the application.
The skeleton defines an App namespace for you; you can place middleware
anywhere within it.
We'll create a simple middleware here that will run on every request, and alter the response to add a header.
We can use our tooling to create the middleware file:
$ composer mezzio mezzio:middleware:create "App\XClacksOverheadMiddleware"This command will create a PSR-15 middleware implementation, a factory for it, and register the two in the application's container configuration. It tells you the location of both files.
Now let's edit the middleware class file. Replace the contents of the
process() method with:
$response = $handler->handle($request);
return $response->withHeader('X-Clacks-Overhead', 'GNU Terry Pratchett');
Now that we've created our middleware, we still have to tell the pipeline about
it. Open the file config/pipeline.php file, and find the line that read:
$app->pipe(ErrorHandler::class);Add the following line after it:
$app->pipe(App\XClacksOverheadMiddleware::class);If you browse to the home page (or any other page, for that matter) and introspect the headers returned with the response using your browser's development tools, you'll now see the following entry:
X-Clacks-Overhead: GNU Terry PratchettYou've created your first middleware!
Creating request handlers
You may route to either middleware or request handlers. In this section, we'll define a request handler and route to it.
Request handlers must implement Psr\Http\Server\RequestHandlerInterface; this
interface defines a single method, handle(), which accepts a
Psr\Http\Message\ServerRequestInterface instance and returns a
Psr\Http\Message\ResponseInterface instance. Write request handlers when you
will not be delegating to another layer of the application, and will be
creating and returning a response directly. Generally speaking, you will route
to request handlers.
The skeleton defines an App namespace for you, and suggests placing request
handlers under the namespace App\Handler.
Let's create a "Hello" request handler. We can use our tooling to create the file:
$ composer mezzio mezzio:handler:create "App\Handler\HelloHandler"The command will tell you the location in the filesystem in which it created the new class; it will also create a factory for you, and register that factory with the container! Additionally, if you have a template renderer in place, it will create a template file for you. make a note of the locations of both the class file and template file.
Open the class file, and now let's edit the handle() contents to read as
follows:
$target = $request->getQueryParams()['target'] ?? 'World';
$target = htmlspecialchars($target, ENT_HTML5, 'UTF-8');
return new HtmlResponse($this->renderer->render(
    'app::hello',
    ['target' => $target]
));
Templateless handler
If you did not select a template engine when creating your application, the contents of your
handle()method will be empty to begin.In that case, alter the above example as follows:
- Add the statement
use Laminas\Diactoros\Response\HtmlResponse;to theusestatements at the top of the file.- Alter the response creation to read:
php
  return new HtmlResponse(sprintf(
      '<h1>Hello %s</h1>',
      $target
  ));
You can also skip the next step below where we edit the template file.
The above looks for a query string parameter "target", and uses its value to provide to the template, which is then rendered and returned in an HTML response.
Now, let's edit the template file to have the one of the following header lines (use the one for your chosen template renderer):
-
Plates
<!-- plates --> <h1>Hello <?= $this->e($target) ?></h1> -
laminas-view
<!-- laminas-view --> <h1>Hello <?= $this->target ?></h1> -
Twig
<!-- twig -->
<h1>Hello {{ target }}</h1>
While the handler is registered with the container, the application does not yet know how to get to it. Let's fix that.
Open the file config/routes.php, and add the following at the bottom of
the function it exposes:
$app->get('/hello', App\Handler\HelloHandler::class, 'hello');Once you've completed the above, give it a try by going to each of the following URIs:
- http://localhost:8080/hello
- http://localhost:8080/hello?target=ME
You should see the message change as you go between the two URIs!
Congratulations
Congratulations! You've now created your application, and started writing middleware! It's time to start learning about the rest of the features of Mezzio:
